

My niece had had bad dreams for several days in a row. My sister mentioned it in passing to her daughter’s preschool teacher. To her surprise, her daughter came home with a dream catcher that she and her teacher made together. My niece was so proud of her dream catcher that she has had three nightmare-free nights since bringing it home. When I saw how cute it was, I had to make one with my daughter.
Materials:
- paper plate
- scissors
- paint
- yarn
- feathers
- beads
- hole punch
- stickers or markers (optional)
Instructions
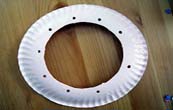 Cut a hole in the center of the plate, leaving about two inches of edging. Punch holes around the inside edge.
 - Paint the remainder (rim) of the plate. This will serve as your base.
- Tie a piece of yarn to the end of a feather while the plate is drying. The length of the yarn will determine how far down your dream catcher hangs.
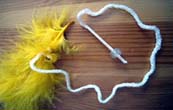 String beads onto the yarn. When you’re finished, tie several knots at the loose end of the string to act as a stopper and secure the beads in place. (Tip: Roll a piece of tape around the tip of the yarn, like an aglet on a shoelace, before starting. This helps young kids slide the beads on, saving time—and frustration!)
- Repeat step 4 until you have your desired number of strands.
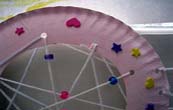 When the paint has dried, randomly string your remaining yarn through the holes bordering the plate. Add a few beads or stickers for extra decoration if you like.
- Punch one hole for each beaded strand of yarn at the bottom of the plate and tie on your strands of beaded, feathered yarn.
When you’re finished, hang the dream catcher on your child’s bedpost or on a wall in her room. If she has a bad dream, she can simply blow the nightmare into the dream catcher.
Sweet dreams!
SOURCE:http://www.pbs.org/parents/crafts-for-kids/dream-catcher/