

We’re celebrating the beauty of fall by creating a festive centerpiece for our Thanksgiving table. Kids will love to help draw, cut and color the paper leaves. They’ll also have a chance to see just how much they have to be grateful for. I hope this fun craft will become part of your family’s Thanksgiving tradition.
Materials:
- colored paper, any style or shape
- pencil or crayons
- scissors, adult and child-size
- adhesive: glue dots, craft glue or tape
- 2 to 3 bare tree branches
- tall vase
- acorns (optional)
Instructions
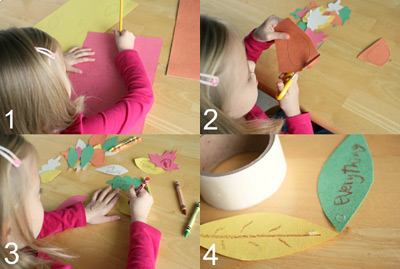
- Using a pencil or crayon, draw leaf shapes onto your colored paper. We drew 25 leaves to fill our branches.
- With your scissors, cut around the drawn leaf shapes on the paper. Cut each leaf shape out; you’ll want a lot of these to attach to your tree.
- Write down different kinds of things you are thankful for on the leaves. You can talk with your children and write their words for them. Or if they’re old enough, let them write their own words. Younger children can also draw a picture of what they are thankful for on their leaf.
- Add glue to the bottom edge of each leaf. I like to use glue dots, shown above. They are mess free and stick really well to the branch. You can also use hot glue (adult use only), craft glue or even tape.
Once your tree is complete, Thanksgiving guests can admire all the wonderful things you are thankful for this holiday season.
SOURCE:http://www.pbs.org/parents/crafts-for-kids/thankful-tree/