

One of my favorite kids’ crafts is making soap. It’s a great craft for kids of all ages. Older ones are able to do it all on their own and younger ones just need a little adult help. The process is fun and the results make great gifts, perfect for teachers, parents, grandparents and the holidays. We’ve even made soap to give as birthday party favors!
Materials:
- plastic soap molds (plastic cups work as well)
- vegetable cooking spray or petroleum jelly for coating the molds
- pure glycerin soap (sold in blocks or cubes at craft stores)
- microwave-safe measuring cup with handle for melting the soap
- red, yellow and blue soap dyes (also found at craft stores)
- small plastic animals or trinkets
- a chopstick or Popsicle stick for stirring
Instructions
- Prepare the molds. Spray the interior of the plastic molds with a small amount of cooking spray, making sure to cover all areas. If you use too much spray, simply use a paper towel to wipe away the excess. Likewise, if you are using petroleum jelly, use just enough to lightly cover the mold.
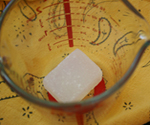 Melt the soap. The size of your mold will determine how much soap you’ll need to begin with. Start by melting smaller amounts of soap; you can always add more. Place cube(s) of soap in the measuring cup and microwave on high for 30 seconds. If some solid soap still remains, microwave in 10-second intervals until soap is melted, but not boiling. Remove the melted soap from the microwave. This is best done by an adult or older child as the SOAP IS HOT.
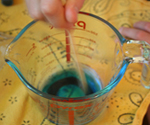 Add the color. Add a drop or two of the liquid soap dye to the melted soap. Too much dye will make your soap dark, so don’t overdo it. Mix colors to get your desired shade. Then stir the dye into the soap using your chopstick or Popsicle stick.
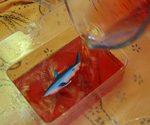
- Partly fill the molds. Carefully pour the hot soap into the molds so that they are filled about a third of the way to the top. Let the soap cool for about 20 minutes and then place the plastic animal or trinket you want to use for decoration on top of the hardened soap.

- Finish the soap. Repeat steps 2 and 3 to melt and color the remaining soap. Pour a second layer of soap into the mold, covering the plastic animal. Let cool and harden for at least 2 hours. Once cool, turn the mold upside down and pop the soap out. To clean the molds, just use hot water—the soap should wash right off!
 You can also make the soap as described above without the trinkets. If you’d like a layered, rainbow look, pour small amounts into the molds and let them harden before adding another color layer. You can also add fragrance to your soaps with a drop or two of essential oils, or natural elements like poppy seeds or citrus peels, if desired. These are just some suggestions. I’m sure that you can come up with even more great ideas. The best part? After cleanup, you can wash your hands with your craft!
SOURCE:http://www.pbs.org/parents/crafts-for-kids/handmade-soaps/