What will the future look like as robotics become more and more a part of our daily lives? Start a conversation about robotics and the future by making this fun robot mask and engage in some imaginary play!
Materials:
- cereal box cardboard
- aluminum foil
- scissors
- yarn
- hole puncher
- craft glue
- pipe cleaners
- colorful sticky notes
- hot glue gun and glue sticks
Instructions
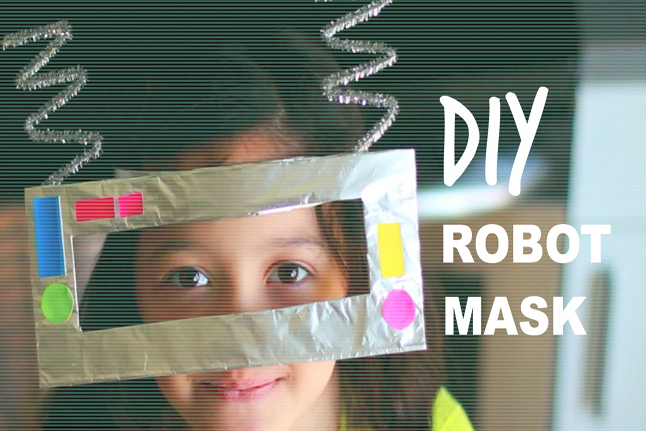
 Cut out a rectangle about 8 inches wide and 4 inches tall. You can eyeball the size, but keep in mind that this rectangle will become the face of your robot mask.
- Leaving about a 1 inch boarder, cut out the center of the robot mask to form a frame.
- Once you have done this, cover the frame in aluminum foil.
- Next, cut out a strip of cardboard about 11 inches long and 2 inches tall. This will be the strap that will attach the frame (which is the mask) to the head. Later you will add yarn so you can tie it on.
- Cover this strip of cardboard in aluminum foil and punch holes.
- Twist and bend 2 pipe cleaners into a zig zag shape. Glue each zig-zag onto the back of the frame of the mask at the top. These will be your robot antenna.
- Keeping the mask flipped over on its back, glue the strip covered in foil to the center of the frame on the back. This strip will bend around your forehead.
- At this point, flip the mask back over to the front and begin decorating. Use colorful post-it notes cut into geometric shapes as buttons for the mask. Glue them on.
- Cut two long pieces of yarn and tie each piece through the holes in the band on the mask. Tie one strand each through each hole. Once finished, tie the two pieces together on the back of your head to hold the mask on.
You are now a robot! Welcome to the future!
SOURCE:http://www.pbs.org/parents/crafts-for-kids/diy-robot-masks-video/