
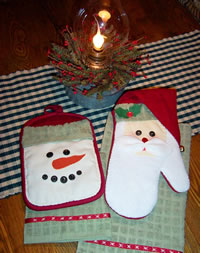
This is a holiday craft that looks great, helps to support the holiday season and works hard for you because they are more than just decorative, their kitchen essentials!
Go ahead and admit it, these are adorable! And, I think they would be the perfect homemade gift for the woman who has everything. I say this because I don’t know anyone who has a Santa oven mitt or a snowman potholder!!
The best part of this project is that you are simply embellishing store bought items so the hard part is done. All you have to do is be creative and have fun!
Materials List:
- One red rectangular shaped oven mitt
- One red mitten shaped oven mitt
- Two green dish towels
- One matching dish cloth
- 2 yards of ¼” red grosgrain ribbon
- ¼ yard each of red, white, and cream wool felt
- Embroidery floss
- Assorted buttons
- 2” x 3” piece of orange fabric
- 2” x 3” piece of fusible interfacing
- Fabri-Tac
Instructions for Snowman:
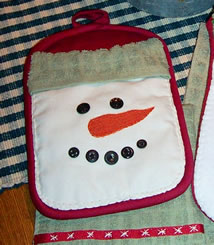
1. To begin the snowman’s face; make a pattern of the rectangular oven mitt by measuring across the mitt from the inside edge of the binding to the inside edge of the binding on the opposite side to get the width of the pattern. The height of the snowman’s face should be about 2/3 the total height of the oven mitt.
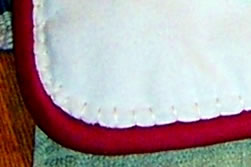
2. Cut a piece of white felt for the snowman’s head, and attach it to the mitt using a blanket stitch or running stitch.
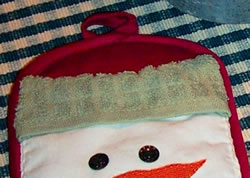
3. To form the ribbing of the snowman’s cap, cut a piece of the dish cloth measuring 3” by the width of the mitt plus one inch. Turn under the raw edges of the fabric ½” and stitch it in place just above the top of the snowman’s head.
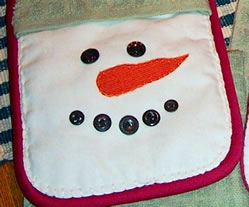
4. Add a face to the snowman with seven black buttons. Work with the buttons on the oven mitt until you find the perfect placement, and then used a pencil to lightly mark each spot.
To create the carrot nose, fuse a scrap of orange fabric to a piece of fusible interfacing. Cut out a carrot shape and stitch it into place. Lastly, stitch the buttons into place.
Instructions for Santa:
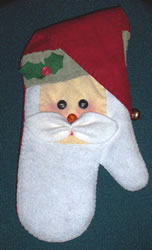
1. First trace the shape of the oven mitten onto a piece of paper. Cut the pattern ¼” in from the line all the way around the pattern, decreasing it’s’ size slightly. Using this as a pattern cut a “beard” out of white felt and sew it to the mitten with a blanket stitch.
2. To create the face, cut a rectangle of cream felt measuring approximately 4” x 6”. Cut the corners so they are rounded and stitch the face in place with the blanket stitch.
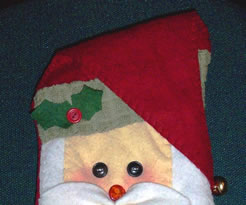
3. To create a hat, make an isosceles triangle paper template measuring 8 ½” high by the width of the mitt. Using this as a pattern, cut two triangular shapes out of red felt. Stitch them together with the blanket stitch and then stitch both to the top front of the mitt. Form the ribbing for Santa’s hat just as you did for the snowman.
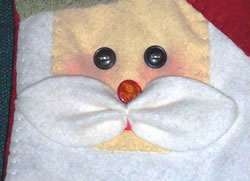
4. To make Santa’s mustache, cut a rectangle of white felt measuring 1 ½” x 5”, rounding the corners. Using white embroidery floss, wrap the thread around the center of the mustache several times and pull it tight to create a 3-D effect. Stitch the mustache in place and add two black buttons for Santa’s eyes and a red button for his nose.
Santa gets his rosy cheeks from a little bit of actual blush makeup. You can just see a touch of a mouth peeking out from under his mustache. This is just a little piece of red felt tucked in and glued with Fabri-Tac. And don’t forget to add a jingle bell to the tip of Santa’s hat!
Shari
SOURCE:http://mattandshari.com/crafts/seasonal-crafts/create-your-own-snowman-and-santa-potholders/