
Strawberry jars have openingson the sides.
Because strawberry jars are handmade and somewhat unique, buy the strawberry jar first, then fit the other terra-cotta elements to it.
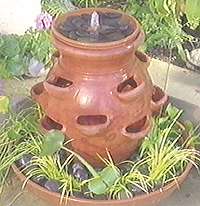
Create your own tabletop fountain with our how-to.
continue reading below
What You Need:
- Safety glasses
- Electric drill
- 3/8-inch drill bit
- 3/8-inch vinyl tubing (must be several inches longer than the strawberry jar and azalea pot, stacked)
- 3/8-inch pipe fittings (male input with barb, reducer, and flare — see details below)
- Fountain pump (must fit inside plastic saucer and upside-down azalea pot)
- Plastic saucer (must fit inside rim of upside-down azalea pot at base of fountain)
- Terra-cotta azalea pot (Rim of upside-down pot must fit inside base of terra-cotta bowl. Rim also must fit over plastic saucer.)
- Large tapered terra-cotta bowl (Base must be larger than rim of upside-down azalea pot and large enough to accommodate aquatic plant.) To prevent seepage though the walls of the bowl, choose a glazed bowl or seal the surface.
- Terra-cotta saucer (must sit neatly in opening on top of strawberry jar)
- Large strawberry jar (Ours was 22 inches tall.)
- Silicone glue
- Pebbles
- Electrical cord
- Aquatic plants
Details About the Pipe Fittings:
These are the specific parts we purchased to build the fountain, although similar parts from other manufacturers also will work. To make the fountain bubble gently, use only parts 1 and 2. For a bigger jet of water, use all three parts.
1. Anderson Barrows part #A294, 3/8 x 3/8 inch. This is the i.d. barb to MIP adapter that goes through the hole in the terra cotta saucer. The tubing attaches to the bottom of this part, leading to the pump.
2. Anderson Barrows part #P44, 3/8 x 1/8 inch. This is a brass pipe reducer, which screws onto the adapter in the top of the saucer.
3. Anderson Barrows part #U242, 1/4 x 1/8 inch. This is the flare, also known as tubing to male pipe half union.
Instructions:
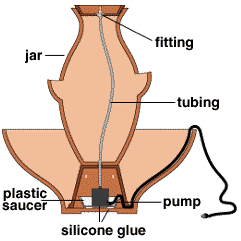
1. Put on safety glasses. Drill a hole through the center of the terra-cotta saucer.
2. Using a masonry drill, bore four to six holes 1 inch from the rim of the azalea pot for aeration. Using a file, notch azalea pot for an electrical cord to fit through.
3. Using silicone glue, secure plastic saucer into large tapered bowl (to plug hole).
4. Install brass pipe fittings (male input with barb, reducer, and flare — which adjusts the height of the water spray) with 3/8-inch vinyl tubing through the bottom of the terra-cotta saucer.
5. To assemble fountain: Place pump in base; attach vinyl tubing to pump; and thread vinyl tubing through the hole in the bottom of the azalea pot, lining up the notch with the cord. Snake vinyl tubing through the strawberry jar and set on top of upside-down azalea pot. Attach vinyl tubing to the end of the pipe fittings,and rest terra-cotta saucer on top of the strawberry jar.
6. Place fountain near electrical source. Add pebbles and aquatic plants as desired. Be sure to purchase plants that thrive with their roots in water. Add stones to secure the roots.
Discover more garden projects you can make yourself.
SOURCE:http://www.bhg.com/gardening/landscaping-projects/water-gardens/terra-cotta-fountain/