
I often get asked if making your own art materials saves money. The honest answer is that sometimes it does, sometimes it doesn’t, a fact I find true of DIY projects in general. Can you purchase scratch art paper at a low cost? Of course! But making it is a lot of fun, from coloring the hidden layer, to painting it, to finally scratching it.
Materials:
- white card stock cut into postcard-size pieces (roughly 4″ x 6″)
- crayons
- painter’s tape
- small roller brush or paintbrush
- black tempera paint and liquid laundry detergent
- shallow bowls
- toothpicks, forks or other items to scratch with
Instructions
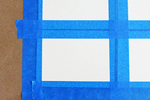 Cover the surface you are working on; this is a messy project! Tape the backs of your cards to the work surface.
- Using painter’s tape, mask off the edges of each postcard. I left about a 1/2″ border on all sides.
 Cover the entire postcard with crayon. This is an important step. You can either use one color of crayon or multiple colors. I recommend using a few colors.
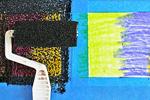
- Mix the paint and detergent together using a 1:1 ratio. Pour into a shallow bowl. I like to use recycled meat trays for this. If you are using India ink, pour it directly into a bowl/tray.

- Using your roller brush, cover the entire card with the paint-detergent mixture. Let dry.
- Repeat with additional coats as necessary until the entire surface is covered. Let dry completely.
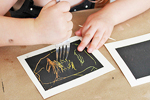
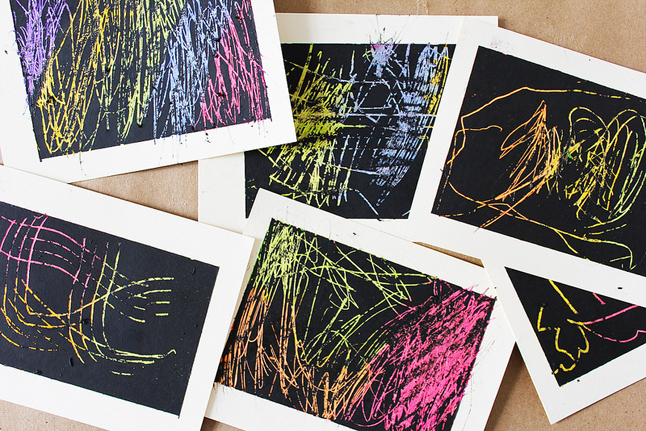
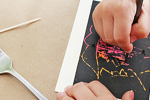
- Peel the tape off the cards carefully so as not to rip the card stock. When the cards are finished, scratch them using toothpicks, chopsticks, forks, etc. to make drawings.
I absolutely love how these turned out! The final product always looks like a little piece of art no matter what the skill level of the child; in fact, I think the messier the scratching the better! Tell us: Did you use your scratch art paper as cards? Or as works of art for the home?
SOURCE:http://www.pbs.org/parents/crafts-for-kids/scratch-art-paper/