

We are so thrilled about how our fall tree craft turned out this year. Who knew some odds and ends puzzle pieces could make such a work of art!
Materials:
- brown paper bag (the kind you use for a bag lunch)
- construction paper (we used blue for the color of the sky)
- scissors
- glue
- puzzle pieces
- red, yellow, orange and green paint
- paper plate
- paintbrush
- fork
Instructions
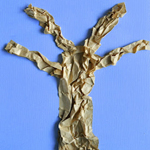 Start by making a tree trunk and branches out of the brown paper bag. After cutting strips off the bag (larger one for the trunk, smaller ones for the branches), scrunch them up to look like wrinkly tree bark and glue them onto a blue (color is optional) piece of paper.
- Make the leaves out of puzzle pieces. We used some from puzzles that were missing too many pieces to keep anymore. To get a cool marbled effect, put squirts of red, yellow and orange paint next to each other on the plate.
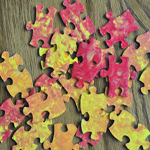 Then, with the end of your paintbrush, swirl the colors together until they look marbled. Dab your brush into the paint and then onto the white side of the puzzle piece. NOTE: Dab the paint carefully to transfer the marble. If you brush the pieces, the colors will just blend into one color.
 - While the puzzle pieces are drying, used a fork and green paint to make grass on the bottom of the paper (around the trunk). Once the puzzle pieces are dry, use glue to place them all over the tree. We overlapped some of the puzzle pieces to give it more dimension.
This craft was fun and allowed my children to be creative—Luke even said it really looked like the leaves were falling from the trees! Enjoy this craft and have a lovely fall season.
SOURCE:http://www.pbs.org/parents/crafts-for-kids/puzzle-trees/