
Lattice is inexpensive and demands no special expertise to build — you can install it with only simple hand tools and an electric drill/driver.
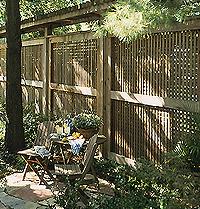
The term latticework refers to any decorative pattern made with narrow, thin strips of wood. Latticework designed to give privacy has 1-1/2 inch openings; with garden-spaced lattice, the openings are 3 inches.
continue reading below
Prefab Vs. Homemade
Most lumberyards and home centers sell 4 x 8-foot prefabricated lattice panels for a cost that often is less than that for the lath alone. These panels are easy to install because the cutting and nailing already has been done. Inspect prefab latticework carefully before you buy, however. Cheaper varieties often are made with lath much thinner than that sold in individual pieces, and the staples holding cheap lattice together may be thin and dislodge easily. For this project, we used a prefab panel.
Instructions:
1. To make lattice, start with a frame like the one shown in Step 1 below. Then, if desired, paint or stain the frame and the strips of lath you’ll use for the lattice. If you prefer to leave the wood natural, coat it with a wood preservative.
2. Add the lath. Once the paint is dry, lay the lath against the frame diagonally, placing the strips so each strip touches the next to form a solid screen. Nail every other strip, then remove the pieces not nailed. Repeat this process for the second course of lattice, starting in the opposite corner. For garden-spaced lattice, nail every third strip.
3. Blunt the nails to avoid splitting the extra-thin strips. Do this by pounding on them with a hammer. After nailing all strips to the frame, trim the ends with a crosscut or circular saw.
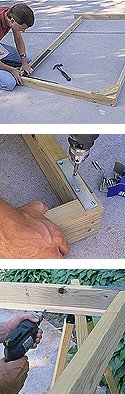
4. Build the frame. After you’ve set the posts, measure the
distance between them and build a 2×4 frame. Square each corner, using temporary wood braces to hold the corners square. Then nail the frame together at each corner.
5. Assemble. Remove the braces one by one, check each corner again with a square, and secure the joint with a metal strap or angle. Use only galvanized screws and hardware.
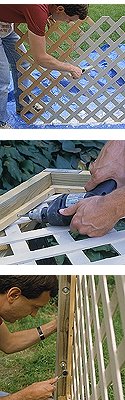
6. Install the stop. Now attach the first stop to the inner side of the frame. Align it with one edge, predrill holes at foot or so intervals, and drive screws through the 1 x 1-inch lumber.
7. Prime and paint. Purchase a prebuilt panel at a home center. Prime and paint the latticework with a brush, or immerse it in a large, shallow pan of paint. If your plans call for painting the frame and stops, do them now, too.
8. Finish the panels. After the paint dries, lay the panel atop the frame’s first stop, then install a second stop on top of the panel. If desired, attach the lattice to the first stop with a staple gun before adding the second stop.
9. Fasten panels. Fasten the frame to the posts with lag screws spaced about a foot apart. Predrill holes and, for a neater appearance, countersink them as well. Fit each lag screw with a washer before driving it. If you painted or stained the frames, touch up around the screws.
Latticework Styles
Latticework lends itself to a variety of decorative effects. To interplay round and square openings, bore holes at the points where strips intersect.
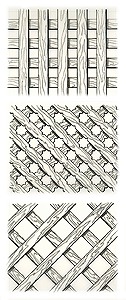
Vertical and horizontal strips make a strong grid pattern. If you don’t mind a rough texture and variations in thickness, buy “fall-down” lath, inexpensive wood left over when lumber is milled.
Notched lattice strips create an interesting design motif. You can purchase panels made from notched lattice, buy notched strips, or notch the strips yourself.
Garden-spaced latticework doesn’t provide a lot of privacy until vines begin to flourish. If you choose latticework for a trellis or arbor overhead, construct it with 1 x 2s, not lath.
Joinery Techniques:
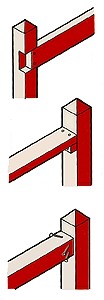
If you don’t like the looks of metal rail connectors, attach rails to posts with one of the joints shown here. All work equally well. Choose based on your tools and skills. To make a dado joint, cut away part of the post so the rail will be flush (or nearly flush) with the post. For a block joint, nail a short piece of 2 x 2 to the post, rest the rail on top of it, and toenail through the block into the post. For a butt and toenail joint, drive nails at an angle through the rail into the post.