First of all, don’t let lace intimidate you! Lace is created by mixing stitch increases and decreases in various ways to create a pattern. Some increases and decreases keep the stitches looking straight, while some tilt the look of the pattern to the left or to the right. The first set of repeats in any lace may seem tricky, but before long you’ll be flying through the patterns with ease. With these lace patterns, the stitch count remains the same for every row so you can always check to make sure you’re on target.
Now go find a gorgeous linen or silk yarn, choose one of these lace patterns below and let’s get knitting!
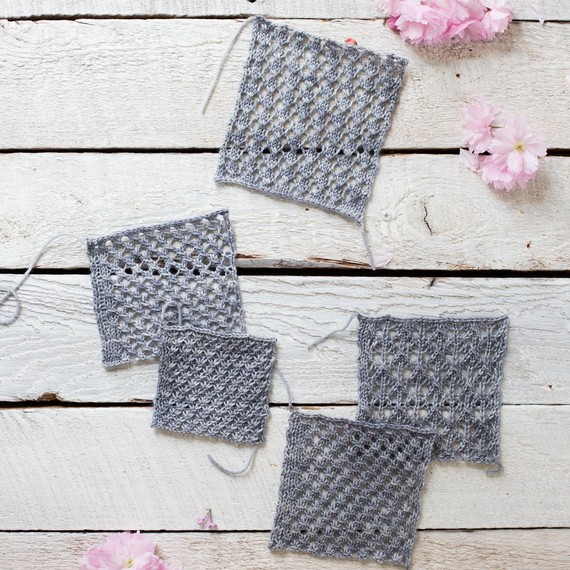
I chose to share with you laces that are all a multiple of either 3 or 6 stitches to keep the math simple. I kept my cast-on stitch count the same for each swatch. You can see by the variety of swatch size below that each lace pattern creates varying sizes of fabric. Additionally, your choice of yarn, needle size, and the tension with which you knit will all affect the size of your finished piece. Keep this in mind as you design or think about your own project.
For each of the pattern swatches:
Needle size: US 4 (3.5mm)
Yarn used: Madelinetosh Pashmina in Charcoal
Cast on 28 stitches (multiple of 3 or 6 plus 2 selvage stitches on either side of the lace pattern).
If a lace pattern needs an extra stitch to be completed (Lace 3 and Lace 5), I used my second selvage stitch on the right side of the work as part of the lace pattern.
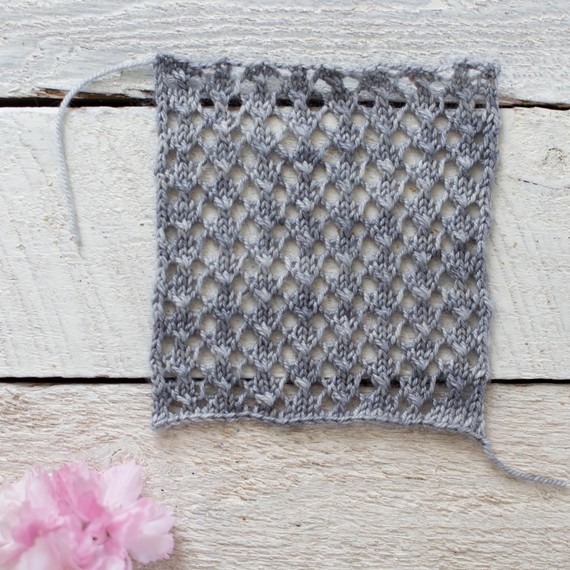
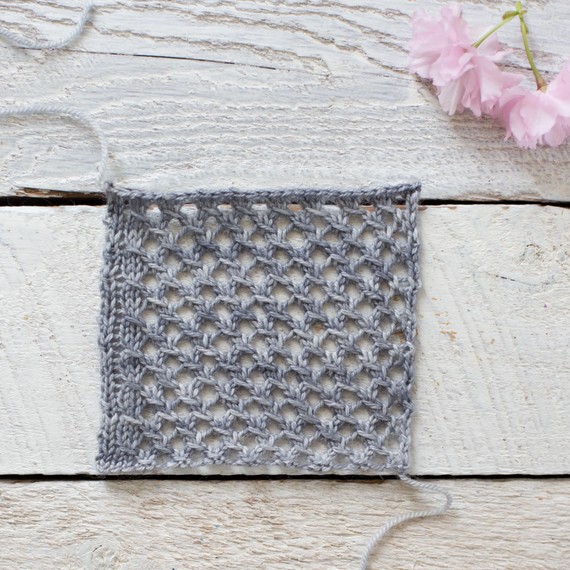
Lace Pattern 1
Math: Multiple of 6 stitches, 4 row repeat, 28 stitches x 40 rows = 5.5 inches square.
Note: Don’t forget that the pattern written below does not include the selvage stitches you have cast on.
Key:
– k: knit
– yo: yarn over (Note: Bring yarn to front of work, then knit as usual. The working yarn will create an extra stitch.)
– sl2 k1 P2sso: Slip two stitches as if to knit, knit 1, pass the 2 slipped stitches over the knit stitch. (Note: Slipping a stitch simply means moving a stitch from your left hand needle to your right. In this case, you put the needle into the stitch as if you were going to knit. Then, as you slide it, the part of the stitch (or leg) that sits in front of the needle switches which is part of the design.)
Stitches:
– Row 1: *k3, yo, sl 2 k1, p2sso, yo*, repeat from * to * to end
– Row 2: Purl all stitches on wrong side/even rows
– Row 3: *yo, sl 2 k1, p2sso, yo, k3*, repeat from * to * to end
– Repeat rows 1-4 as necessary
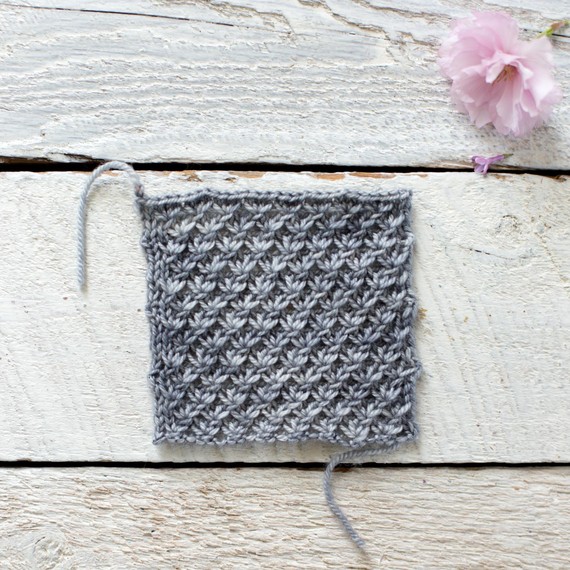
Lace Pattern 2
Math: multiple of 3 stitches, 4 row repeat, 28 stitches x 36 rows = 4.5 inches square
Note: Don’t forget, the pattern written below does not include any selvage stitches you may have cast on.
Key:
– k: knit
– yo: yarn over (see note above)
– sl1: slip 1 stitch as if to knit (see note above on slipping stitches)
– psso2: pass slipped stitch over 2 knit stitches
Stitches:
– Row 1: k1, *yo, sl1 k2, psso2*, repeat from * to * as necessary, knit 2 last stitches.
– Row 2: Purl all stitches on wrong side/even rows.
– Row 3: *yo, sl1 k2, psso2*, repeat from * to * to end.
– Repeat rows 1-4 as necessary.
Lace Pattern 3
Math: multiple of 3 stitches +1, 4 row repeat, 28 stitches x 28 rows = 3.5 inches square
Note: The pattern written below will need to use 1 of your selvage stitches. K 1 selvage stitch on the right and start the pattern.
Key:
– k: knit
– yo: yarn over (see note above)
– k3 tog: knit 3 stitches together as one
– k3 tog again: knit the same 3 stitches together again
Stitches:
– Row 1: k1,*k3tog but leave those 3 stitches on left hand needle, yo and k3tog again and removing the 3 stitches from left hand needle*, repeat from * to* as necessary
– Row 2: Purl all stitches on wrong side/even rows
– Row 3: *k3tog but leave these 3 stitches on left hand needle, yo and k3tog again (the same three stitches) and now pull the 3 stitches from needle*, repeat from * to* as necessary, until last stitch, k1
– Repeat rows 1-4 as necessary

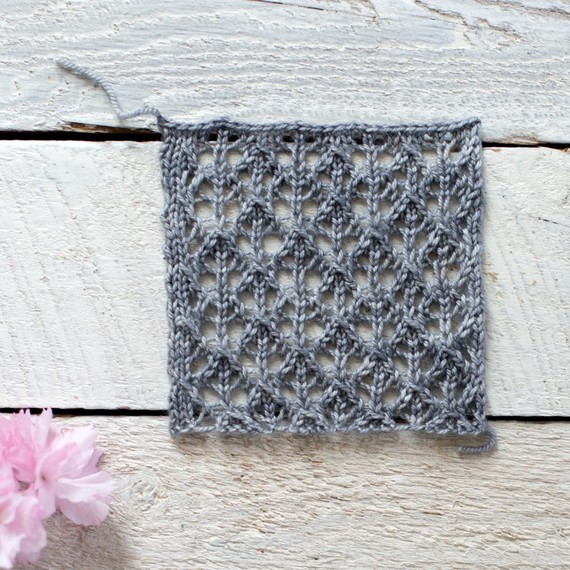
Lace Pattern 4
Math: Multiple of 3 stitches, 6 row repeat,28 stitches x 36 rows = 4.5 inches square
Note: Don’t forget: The pattern written below does not include any selvage stitches you may have cast on.
Key:
– k: knit
– yo: yarn over (see note above)
Stitches:
– Row 1: *yo, k3, pass the first knit stitch over the other 2*, repeat from * to * as necessary.
– Row 2: Purl all stitches on wrong side/even rows.
– Row 3: k2, *yo, k3, pass the first knit stitch over the other 2*, repeat from * to * as necessary, until last stitch, k1.
– Row 5: k1, *yo, k3, pass the first knit stitch over the other 2*, repeat from * to * as necessary, until last 2 stitches, k2.
– Repeat rows 1-6 as necessary.
Lace Pattern 5
Math: multiple of 6 stitches +1, 8 row repeat, 28 stitches x 36 rows = 4.5 inches square
Note: The pattern written below will need to use 1 of your selvage stitches. K 1 selvage stitch on the right and start the pattern.
Key:
– K2tog: knit two stitches together as one
– K2togtbl: knit two stitches together through the back loops
– Psso: pass slipped stitch over (see note above)
Stitches:
– Row 1: k1,*yo, k2tog tbl, k1 k2tog,yo, k1*, rep from * to * as necessary
– Row 2: Purl all stitches on wrong side/even rows
– Row 3: k1*yo, k1, sl1, k2tog, psso, k1, yo, k1*, repeat from * to* as necessary
– Row 5: k1,*k2tog, yo, k1,yo, k2togtbl, k1*, repeat from * to* as necessary
– Row 7: k2tog; *k1, yo, k1, yo, k1, sl1, k2tog, psso*, repeat from * to * as necessary until last 5 stitches, k1, yo, k1, yo, k1, k2togtbl
– Repeat rows 1-8 as necessary
To design a simple shawl, follow these five easy steps:
1. Make a lace swatch as above.
2. Measure your swatch. How many inches wide and high is the lace portion (don’t include the selvage edges) of your swatch?
3. Decide on shawl dimensions and calculate required stitches. Let’s say you want a shawl that is 66″ long and 20″ wide with a selvage of approximately 1″ at each end. Divide the width of desired lace portion (64″) by the width of the lace portion of your swatch (say 4.25″), you need approximately 15 times the number of stitches as you had in the lace portion of your swatch. Each swatch above has 24 stitches of lace, so in this example, multiply 15 times by 24 stitches to get 360 stitches total. The number of sititches needs to be divisible by the required number of stitches in your lace repeat (all laces here are repeats of 3 or 6 and 360 is divisible by both). Add 6 sitches of garter stitch (knit on both sides) selvage to each end (12 stitches total). Add the lace stitch count (360 stitches) to the selvage stitch count (12 stitiches) for 372 stitches total.
4. Calculate required rows. To figure out how many rows you will need to knit, divide your desired shawl height (20″) by the height of your total swatch (4.5″), you need approximately 4.4 times the number of rows from your swatch (say 36) for a total of approximately 158 rows. You will want to end at the end of a lace repeat so adjust this number of rows accordingly. You can also just measure the width as you go without bothering to count rows.
5. Calculate required yardage. Although I’ve given you an approximate number above, to get a better sense of required yardage, rip out the swatch that you used for steps above. Measure the total yardage required by swatch (say 18 yards). Multiply this yardage by how many times wider the scarf will be (15 times) and by how many times higher the shawl will be (4.4). This number will suggest the approximate yardage (18 x 15 x 4.4 =1,188). Because the original swatch has 4 stitches of selvage for each row included in the yardage, it will more than make up for the added selvage width on each end of the shawl. This should be a slight overestimation.
Simple Shawl Pattern
Based on the above five steps with a four-row repeat lace (adjust with 6 or 8 row repeat as desired):
Cast on 372 stitches (Note: If an additional stitch is required for the lace (as in lace 3 and lace 5), add one additonal stitch to your cast on stitch count)
Stitches
– Row 1: k6, , k6
– Row 2 and every even/wrong side row: k6, purl until 6 stitches remain, k6
– Row 3: k6, , k6
– Repeat rows 1- 4, until desired height
– Bind off