

This activity is fun for kids of all ages and is something they’ll use after it’s finished. It’s made of a few simple materials that you most likely already have in your home, and can include a range of creativity in design, color and shape.
Materials:
- 2 bowls
- plastic wrap or a gallon-sized Ziploc bag
- glue
- newspaper
- water
- yarn
- scissors
Instructions
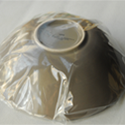 Choose one bowl to use as your mold, keeping in mind that the shape of this bowl will determine the shape of your yarn bowl.
- Cover the bowl with plastic wrap or use a gallon-size Ziploc bag—just stick the bowl in the bag and tuck the ends inside when you place the bowl upside down on your work surface.
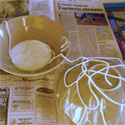
- Cover the work space with newspaper—this craft can get messy!
 Pour some glue (we used Elmer’s White School Glue) into the second (unwrapped) bowl and add a little water to dilute it. Mix up the water and the glue.
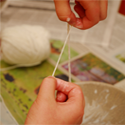
- Once you’ve lined up the cotton yarn ball, glue bowl, and bowl mold, unravel the yarn and dip it in the glue. (Note: Don’t cut it yet!)
- Pinch the yarn between your fingers and slide them along it to squeeze off the excess glue.
- Then, just wind the yarn back and forth, over and around the outside of the bowl mold.
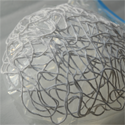
- Continue until the bowl is covered the way you want it and then cut the yarn. Press the yarn down gently to help the strands stick together.
 Allow the yarn to dry. If you are in a hurry, use a hair dryer to speed things up.
When the yarn is dry, remove the bowl from under the plastic. Then, gently peel the plastic off the yarn bowl. Kids will love to display the bowl and keep trinkets in it—it’s a great way to hold chunky items that won’t slip through the cracks.
SOURCE:http://www.pbs.org/parents/crafts-for-kids/diy-yarn-bowls/