
Making your very own napkin rings is a great (and super easy) craft for kids! As a bonus, these beaded and block-painted napkin rings will encourage your kids to help you set the table. To make this simple and stylish craft (just in time for any holiday dinner) you’ll need just a few basic supplies.
Materials:
- wooden beads of different colors (we used a mix of natural wooden beads and colored beads)
- paint (any color, but it should contrast with the color of the bead you are painting)
- painter’s tape
- paintbrush
- yarn
- scissors
Instructions
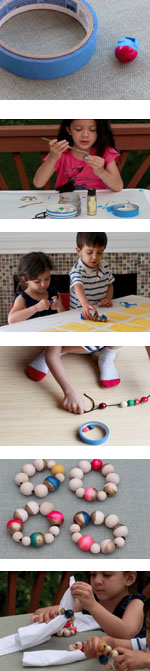 Gather your beads and select a random few to paint. You will be block painting the beads. Cover the beads you’ve selected with painter’s tape only on one side, so the other half is uncovered.
- Paint the beads you’ve taped. It’s okay if paint gets on top of the tape because you will be removing it once the paint dries.
- Once you have painted your taped beads, set them aside and allow them to dry. Next (this part is fun for little hands) remove the tape to reveal the clean lines of your block painting!
- Now you can begin making the napkin rings. To do this, string the beads onto some yarn. You can tape the end of the yarn to make it pointy and easier to thread through the holes in your beads. Mix and match sizes and colors. Use painted and unpainted beads and create any pattern you wish! This step is a great opportunity to discuss and learn about patterns with children.
- Once you string about 9 or 10 beads on the yarn, you can tie the ends of the yarn together in a knot to form a ring. Cut off the excess yarn at the ends so you can’t see them.
Now pull some napkins through the rings and help set the table!
SOURCE:http://www.pbs.org/parents/crafts-for-kids/diy-napkin-rings/