
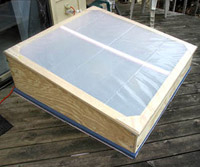
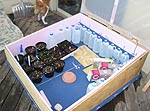
A cold frame is a bottomless box with a skyward-facing window. Like a miniature greenhouse, a cold frame lengthens the gardening season by protecting plants and seeds from the moderately cold temperatures and drying winds of late fall and early spring. With the addition of a simple heater, a cold frame can be used nearly year-round to grow cool-season flowers and vegetables, and to give summer plants an early start.
The low-cost, easy-to-build cold frame presented here takes one or two weekends to build and uses widely available materials. You can place it on a deck or patio to grow plants in pots, or you can place it over a garden bed.
continue reading below
Materials
- 4-x-4-foot sheet of 1/2-inch exterior plywood (or 2 2-x-4-foot panels) plus scraps of 1/4-inch plywood for corner braces
- 18-gauge perforated steel angle — approximately 3 feet
- 2 1x3x8-foot clear pine for the top frame
- Hardware: 25 1/4-inch-diameter by 1-inch-long hex bolts and nuts; 16 washers sized to fit the hex bolts; 4 4-inch steel L-brackets; 45 3/4-inch No. 8 wood screws; 3 3-1/2-inch steel or brass hinges. Expert tip: Buy a few extra bolts and screws.
- 6-mil poly sheeting, clear, to cover the top of the cold frame
- Tools: Long ruler or tape measure; saber saw or circular saw; hacksaw; power drill and 1/4-inch bit; screwdriver (or screwdriver bit for drill); staple gun, or a hammer and 3/4-inch roofing nails
- Optional materials: 1 or 2 4-x-8-foot sheets of 3/4-inch rigid foam board insulation (Foamular or similar). 2 or 3 100-bulb strings of miniature holiday lights. Vinyl tablecloths or blankets.
Instructions
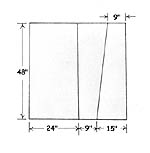
1. Using a saber saw or circular saw, follow the cutting diagram to make 9-x-48-inch front; a 15-x-48-inch back, and two 48-inch-long sides that slope from 15 to 9 inches wide.
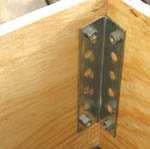
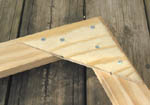
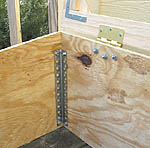
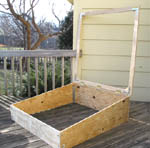
2. Join the side pieces (with the angled cut facing up) to the front and back pieces using the 18-gauge perforated steel angle. (Buy a 3-foot piece and cut it with a hacksaw.) Use the 1/4-inch hex bolts to attach the angles to the plywood. Always use a washer between the head of each bolt and the plywood. The finished box is 48 inches wide by 49 inches long (48 inches for the length of each side plus 1/2-inch thickness for the front and back pieces).
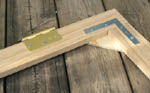
3. To make the lid frame, cut two 8-foot clear pine 1x3s into four pieces: two 46 1/2 inches long; two 47 1/2 inches long. These four pieces can be arranged to form a frame that is 49 inches by 50 inches. Join these pieces using 4-inch steel L-brackets on the underside. Expert tip: Before you cut, verify that these measurements will produce a lid frame that will overlap the sides and front of your box approximately one inch. To accommodate the hinges, the lid frame will be flush with the back of the box.
Flip the lid frame over. Cut triangles from the 1/4-inch exterior plywood scraps and attach them to the top side of the lid frame using 4-3/4-inch-long No. 8 wood screws in each brace.
4. To hinge the lid to the box, use the three 3-1/2-inch hinges. Attach the hinges to the underside of the lid frame first, using 3/4-inch-long No. 8 wood screws.
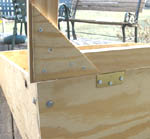
Next, lay the lid frame atop the box and used the hinges to mark the location for drilling 1/4-inch holes on the outside of the back of the box. Use 1/4-inch hex bolts to fasten the hinges to the plywood. Use washers between the nuts and the plywood.
If the lid and/or the box is not quite square, you can push on the corners of the box to adjust the shape.
5. To complete the project, remove the hinge bolts from the box, then unscrew the hinges from the lid frame. (To make it easier to get everything back together, number the hinges and their location on the lid frame. Also, mark the location of the screw holes in the lid frame by circling them with a bold marker.
Wrap the lid frame with a single layer of 6-mil poly plastic sheeting. (Expert tip: See the next page for a tip involving rigid foam insulation material.) Start with a piece of poly sheeting about 4 1/2 feet wide by about 10 feet long. Use the staple gun or roofing nails to secure the poly sheeting to the lid frame. To reduce tearing, use strips of thin cardboard between the poly and the fasteners. Try to get the covering as taut as possible, and avoid getting multiple layers of poly on the hinge side of the lid.
6. Place the covered lid atop the box, and reattach the hinges to the box with the bolts.
Your cold frame is now ready to use and will protect plants from cool weather. A very important note: Your cold frame will warm up very quickly when the sun is shining directly on it. Always prop open the lid a little on bright sunny days, even if the air temperature is cool. On some days, you may want to open the lid completely. Always close the lid before nightfall to preserve the day’s warmth.
To get the most use out of the frame, you should plan to add the insulation and heating options described on the next page.
Useful Tips
Insulation
Insulation is critical to keeping temperature swings from overwhelming your cold frame inhabitants. The easiest way to insulate your cold frame is with pieces of 3/4- or 1-inch-thick rigid foam insulation board. This material can be cut and shaped easily with a utility knife. Expert tip: Make sure you’re using extruded polystyrene insulation, not the crumbly white insulation.
Expert Tip
To improve the insulation power of the lid, cut a 2-inch-wide strip of insulation and tape it to the inside of the poly film before attaching it to the lid frame; this will help maintain an air space between the two layers of poly.
On cold nights, place some pieces of insulation atop the lid, then cover everything with an old plastic tablecloth. Taken together, these steps will help keep temperatures in the cold frame from dropping too much.
You can also moderate temperature swings by adding water-filled milk jugs inside the cold frame. The water warms during the day, then releases that heat slowly at night.
If you’ll be using the cold frame on a deck or patio, consider setting it atop a couple of layers of the rigid foam board insulation.
Adding Heat
You can heat your cold frame with special warming cables or mats available at well-stocked garden centers. Or you can raise the air temperature in a well-insulated cold frame approximately 10 degrees by plugging in a string of 100 miniature holiday lights (still in their box). You may need to use several sets to heat the cold frame on very cold nights. If you’re using the cold frame on a deck or patio, put scraps of 1/2-inch plywood under the lights to prevent damage to the surface or insulation. If you can keep the temperature at 40 degrees or higher, you can grow many cool-weather plants like lettuce, radishes, and pansies.
Using Your Cold Frame
Resist the urge to fill up your new cold frame right away. Like a new baby, a new cold frame demands a lot of attention at first and can be very demanding. You’ll need to be watchful of the weather, deciding early in the day whether to crack the lid a bit or keep it closed. And you’ll have to be religious about covering the cold frame at night if the temperature is going to drop below freezing.
A great tool for helping you decipher your cold frame’s personality is an electronic remote thermometer. These devices, which cost less than $50, have a sensor you can put in the frame, and a remote read-out that you keep inside. Most have functions that let you review the high and low temperature over any time period.
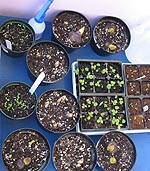
Once you get to know your cold frame, you can start using it to grow just about anything you’d grow in a greenhouse — provided it fits under the lid. By far, the best role for your cold frame is to give you an extra-early head start on growing plants for the coming gardening season.
SOURCE:http://www.bhg.com/gardening/yard/garden-care/building-a-simple-cold-frame/