
Building with brick can be pleasant work, but it takes some practice before you become proficient. This handsome wall will be strong enough for a planting bed up to 2 feet high. Anything higher requires a double brick wall. It will take a couple of weekends to become competent at bricklaying, but the results will be well worth the effort. The completed project will be a permanent landscaping feature you can be proud of.
continue reading below
Before You Start:
Choose bricks that will survive well in continually wet conditions. Common brick may not be strong enough. Be prepared to give your material supplier the length and height of the wall you plan to build. If the bricks have holes in them, purchase special cap bricks for the top course. Arrange to have the bricks resting on a strong pallet near the job site.
Consult your building supplier for the right mixture of cement, lime, and sand, or buy mortar mix. You will need a mortar board (a 3-foot-square piece of plywood nailed to two 2x4s works fine), a wheelbarrow or large container for mixing mortar, a mortar hoe, a brick-set chisel, a mason’s line with line blocks, a pointing trowel, a joint raking tool, and a joint pointer (either convex or V-shaped).
Make a story pole — a length of 1×2 with evenly spaced lines marking the height of each course of bricks. Install a level concrete footing, combining a 12-inch-deep, reinforced, and concrete-filled trench twice as wide as the brick wall will be with concrete footings every 4 feet that extend beneath the frost line.
Fill your raised bed with great soil; learn the basics and more here.
Instructions:
Step 1
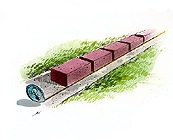
1. Lay out your wall. Chalk a guideline to position the bricks on the center of the footing. Make a dry run: Lay out the bricks without mortar, spacing them evenly. This will tell you if you need to insert a short brick near the end of the run. If necessary, increase the spaces to avoid putting in a very small piece of brick. Mark the locations of the first and last brick.
Step 2
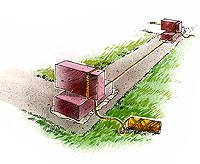
2. Set the first bricks. Mix a small batch of mortar.
Set the first two bricks, one at each end, laying down a 1-inch-thick bed for each. Check for level in both directions, tapping gently with the handle of your trowel to make adjustments. String a mason’s line to mark the level of the first course of bricks. Hold the line in place with bricks.
Step 3
3. Lay the first course. To lay down a bed of mortar
for a course of bricks, first fully load your trowel. Then, with the trowel faceup, set the tip of the trowel at the beginning of the line. As you pull back toward your body, rotate the trowel so that you lay a bed of mortar about 1-inch thick, nearly as wide as the brick, and about three bricks in length. Furrow the mortar by gently running the trowel tip, facedown, along the center. Bricklayers call this step throwing.
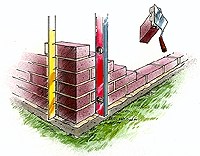
Step 4
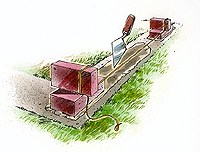
4. Assemble the corners. Build the lead — the beginning point for your courses. This is six courses high, with each course half of a brick shorter than the one below it. (Remember that a brick is half as wide as it is long.) Level and plumb each course, and use a story pole to check for height. Lay down mortar and add the first course. Butter the end of each brick where it abuts another. Add the mortar by making a swiping motion along all four edges of each face.
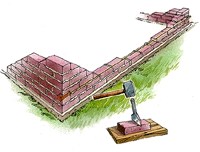
Step 5
5. Fill each course. Duplicate the lead on the other end of the wall. String a mason’s line as a course guide, using line blocks to hold the line flush with the face of the bricks. Using the line as a guide, fill in each course, remembering to throw, furrow, and butter. Cut bricks by first scoring a line around the brick. Then crack the brick using a mallet and a brick set.
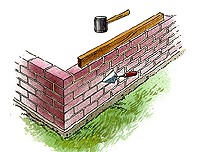
Step 6
6. Check for level. Continually adjust for level and straight courses, tapping gently with a mallet and 2×4. As you proceed, scrape off excess mortar with your trowel, taking care not to smear the bricks. Every so often, press the mortar with your thumb. If it feels firm and your thumb impression does not change shape, the joints can be finished.
7. Finish the joints. Using a pointing tool, first smooth out the vertical joints, then the horizontals. Gently brush away excess as you work. Wash any smeared spots carefully with a damp rag — once the mortar has set, it will be difficult to remove.
SOURCE:http://www.bhg.com/gardening/yard/garden-care/brick-raised-bed/