
You’ve scoured far and wide and settled on the perfect gift — well done! That’s hard work and cause for celebration. As important as the contents of your gift surely are, so too is the exterior. Yep, we’re in the business of details here at Simone LeBlanc, and one of the most important details of all when it comes to gifting is the presentation. We love to imagine the gift wrap and packaging of a gift as yet another place to inject that special, handmade thoughtfulness and personalized sentiment that really makes a gift sing. It’s the first part of a gift that gets its recipient truly excited, and, done correctly, may add an additional keepsake element to the gift. Read on for three easy, elegant, and festive wrapping projects you’ll want to try out this holiday season.
DIY 1: Painterly Gold Sumi
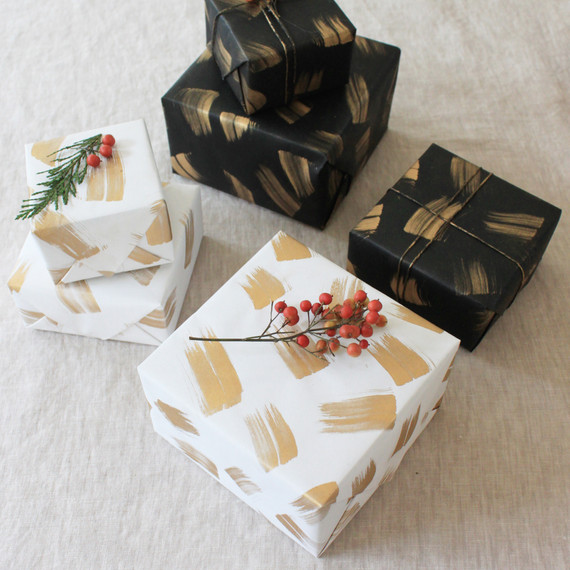
The luminous, luxurious finish of sumi ink makes this simple yet graphic holiday wrapping paper utterly artful. Adorned with simple brushstrokes in gleaming gold, this paper is really a very easy DIY and perfect if you have an entire household’s worth of gifts to prepare.
Materials:
- Paper & Ink Arts Sumi Color in Red Gold
- Watercolor brushes (*Note: The size you choose will determine the size of the brushstrokes. Here, I used a 1/2-inch watercolor brush. )
- Paper Source Solid Color Wrapping Paper Roll in Black and White
- Global Hemp Polished Hemp Twine
- Preserved cedar branches
How to Make the Painterly Gold Sumi Wrapping Paper:
- Cut a large piece of the wrapping paper from the roll. Make sure you cut a piece larger than you think you will use to have leftovers for any last-minute gifts.
- Gently secure paper on all four corners to your work surface.
- Moisten your brush a bit with water and dip into your sumi ceramic dish. The sumi ink is compacted powder, so you’ll need to mix it a bit to get the paint soft and ready for use.
- Simply start adding brushstrokes to your paper. The quicker and more random the placement of the brushstrokes, the better. You want the final look to be spontaneous and energetic — like you had fun painting the strokes. Once you have filled your piece of paper, leave to dry completely. Wrap your packages, securing with twine and foliage and leave for your recipients to enjoy!
DIY 2: Wintry Indigo Hues
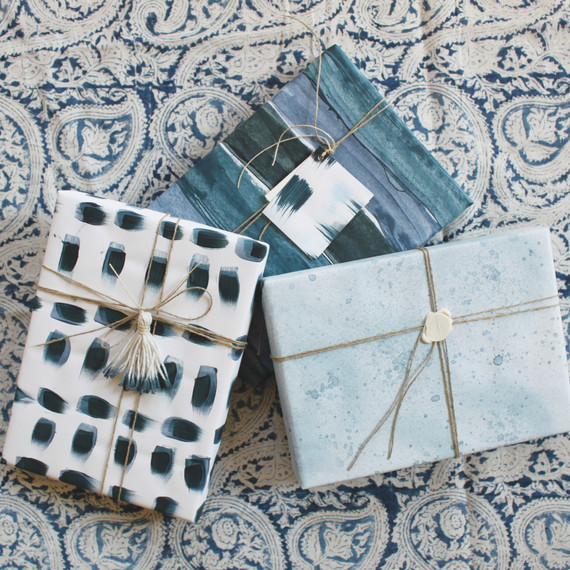
A modern take on holiday colors, rich indigo hues feels crisp and wintry, and are super on-trend, too. The best part is how handmade and artistic the final results feel. Your loved ones will want to keep — and frame — the papers their gifts come wrapped up in!
Materials:
- 3 paint colors that are similar in tone (A light, medium, and dark option will work best. I used Farrow + Ball – Stiffkey Blue [light], Hague Blue [medium], Railings [dark].)
- Watercolor paintbrushes (*note: The size you choose will determine the size of the brushstrokes. I used a 1/2 watercolor brush.)
- White wrapping paper
- 3 spray bottles (1 for each of your paint colors)
- Small cardboard rectangles: I used a stiff paper that I had in the studio. You can use any cardboard and you can make the rectangles any size — these are what you will use to make your stripes. I made mine 1 1/2 inches wide.
How to Make the Wintry Indigo-Hued Wrapping Paper:
Style 1: Stripe Pattern
Cut a piece of wrapping paper roughly to the size you will need to wrap your package. Dip the end of your cardboard into one of your paint colors, about 1/2 deep. Then, simply drag the cardboard in a straight line across your paper. Repeat with each color. Don’t worry about making the stripes perfect in any way — they look lovely when they’re different depths and aren’t necessarily matching up perfectly. Let dry completely, and voila!
Style 2: Brushstrokes Pattern
Cut a piece of wrapping paper roughly to the size you will need to wrap your package. Dip your paintbrush into your lightest color of paint and make a simple, short vertical brushstroke on the paper. Repeat, leaving a space between your strokes that’s about the same width as your paintbrush. For the next line, make a simple, short horizontal stroke. Repeat as you did with the vertical strokes. Once the paint dries, go back over your brushstrokes with the medium-color paint. Repeat with your darkest color paint as the top color. It is fine to “dab” each next layer on — you don’t want to cover up the color underneath. This style looks great when it’s not perfect and shows the beauty of each brushstroke. Let dry completely.
Style 3: Spray-Bottle Pattern
Cut a piece of wrapping paper roughly to the size you will need to wrap your package. Fill each of your spray bottles about 1/4 of the way full with a mixture of about half water to half paint. You want the mixture to be opaque, but not too thick to fit through the sprayer. Shake. Spray your paper with a few squirts of your lightest shade of paint water, then move on to the middle shade and finally, the darkest shade. Let dry completely.
DIY 3: Linen and Foraged Foliage Toppers
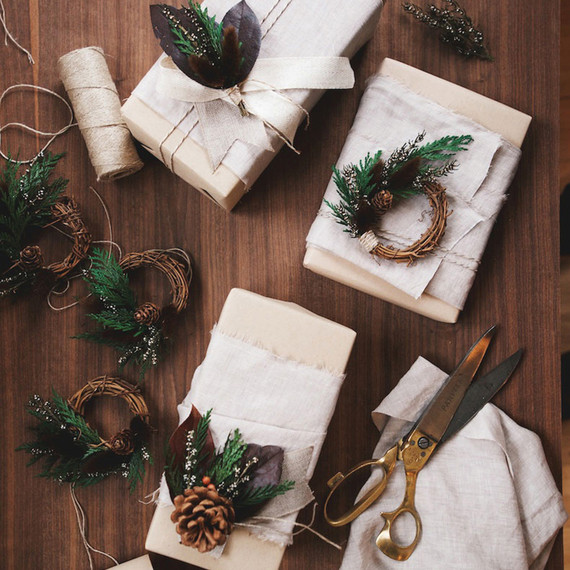
We love including toppers made with seasonal bits of foraged foliage and plant life with the intention of creating a keepsake element with the gift wrap. Set atop simple paper or even affixed to a bag, these toppers add such an elegantly festive holiday pop.
Materials:
- Foliage toppers (You’ll need a mix of seasonal foliage, a glue gun, and a swatch of a sturdy linen ribbon or wired burlap ribbon.)
- A nice, sturdy box for wrapping (Paper Source has some great mailer box options that are so easy to wrap. Paper Mart also has a broad selection of lighter-weight boxes in a variety of sizes, so you will be covered no matter what size your gift may be.)
- Plain rolls of kraft or other neutral-toned wrapping at Paper Source
- Metallic bakers’ twine
- A few strips of natural linen fabric
How to Make the Foliage Toppers:
- Have an anchor for your topper — a bigger leaf, a ribbon, or a mini wreath.
- Gather your materials — a mix of textures and scale yields the best results. We love using pinecones, wreaths, linen pieces, berries, twigs, rosemary sprigs, plumosa fern, and cedar.
- Planning the shape ahead of time will help you create something that matches your vision. Lay it out before starting to assemble.
- When using the glue gun to hold the different materials in place, make sure you use a light hand — think of it as building a mini model — you don’t want to see the glue!
- Use your piece of ribbon to create a backing for the topper. On the flat backside of the foliage, make a loop by crisscrossing the ribbon at the top so you can weave some twine through the top and have a flat, solid surface to affix the topper to the gift.
How to Make the Linen Gift Wrap:
- Cut a piece of wrapping paper roughly to the size you will need to wrap your package. For the linen pieces, cut a strip of linen approximately 1 inch smaller than the width of your box. You will want to make sure that the linen isn’t as wide as the box, so that you can see the kraft paper peeking out on each side of the box underneath the linen. Make sure to cut your linen horizontally, so you do not waste your fabric!
- Carefully wrap your box as cleanly as possible; if you start out with a crisp wrapping job, it will be a lovely contrast to the looseness of the linen wrap. Use double-stick tape to adhere the paper.
- Center your linen strip on your box and wrap the linen around your box. You can adhere the linen in a few different ways: glue gun, double-stick tape, or even loosely hand-sew it together. The linen is meant to look somewhat loose and relaxed — so no need to be perfect here!
- Cut a piece of bakers’ twine 2 to 3 times the length of your box. You can wrap the twine around the box a few times — the more you wrap, the more the metallic thread in the twine will stand out. Tie your twine in a secure little knot so the twine stays taut.
- Once your package is all tied up, tie on your gift topper. Each topper comes backed with a linen cord so you can easily secure it to your gift. Simply tie on your topper and voila — your gifts are ready.
SOURCE:http://www.marthastewart.com/1501173/easy-gorgeous-gift-wrap-diys-try-this-season