
What You Need:
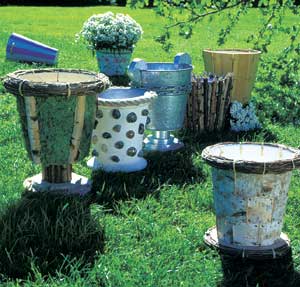
Covered Buckets
- 1 metal or plastic bucket
- 1 sheet of 1/4- or 1/2-inch plywood
- Wood preservative
- Wood glue
- Handful of 1/2-inch screws
- Paper-thin sheets of bark (available at crafts stores) or thin branches, cut into 4-inch lengths (for base)
- Nails
- 12 x 36-inch piece of chicken wire
- 1 sheet or bag of moss (available at garden centers)
- Cable staples
- Thin twigs about 32 inches long
- Twine
- 5 thick split branches about 11 inches long (for sides)
continue reading below
Instructions:
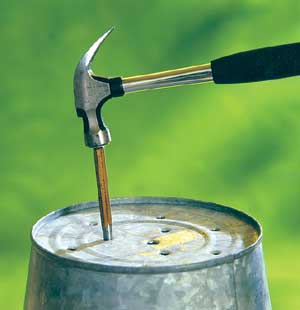
Photo 1
1. Clean and dry the bucket if necessary. Using a nail set and hammer, punch holes into the base of the bucket for drainage (photo 1). Wearing protective goggles, cut circles from plywood for the base using a jigsaw. The size and number of circles you cut depends on the style of base you wish to create; our largest circle is 1 inch larger in diameter than our bucket, and our small circles are half the diameter of our bucket. Sand circles and brush with wood preservative.
Find even more found, whimsical garden design inspiration with our fun ideas.
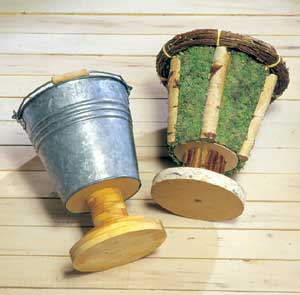
Photo 2
2. Stack the circles from smallest on top to largest on the bottom to create the tiered base (photo 2). Glue pieces together. Drill or punch a hole into the plywood bucket base, then screw the bucket to the tiered base. (Our tall base is about 7 inches high). Remove the bucket handle using a handsaw or wire cutters. Drill holes along the bucket top (you will later use these to attach the branch “wreath” to the top of the bucket). Decorate the shank of the base with thin strips of bark or twigs, gluing or nailing respectively.

Photo 3
3. Lay out the chicken wire until flat. Apply moss with the smooth side facing down. Place the bucket on top of the moss (photo 3). Tuck the excess chicken wire around the top and bottom edges of the bucket. Secure chicken wire to bucket with cable staples.
4. Create a wreath the size of the bucket top from thin twigs or another material. Wrap the bundled twigs with twine to keep them in place. Run twine through the holes at the top of the bucket to secure the wreath; tie ends of twine together to secure.
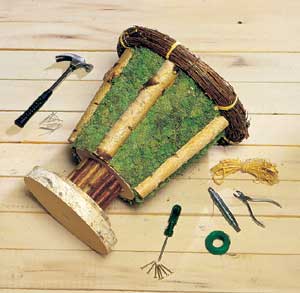
Photo 4
5. Decorate the body of the bucket with the five thick branches evenly spaced around the bucket (photo 4). Fasten them to the chicken wire and moss using three small screws inserted in each branch from the inside of the bucket.
Projects 1 and 2
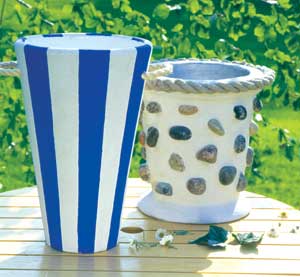
1. Coat a bucket or planter with tile adhesive (a waterproof, cementlike dry mortar available in crafts stores and home centers). After the first coat is dry, add a thick layer of adhesive where you want stones, working in a small area at a time. Press clean, dry stones into the adhesive in a random pattern. Clean extra adhesive from stones with a small spatula. Secure thick rope to the container top with more adhesive.
2. Paint a striped container easily. Prime a plain container, then mark off stripes with a pencil. Paint the stripes by hand with a small brush.
3. Sharpen branches to transform a boring bucket. Peel and sharpen one end of enough branches to cover the outside of your bucket. Drill a small hole 2-1/2 inches from one end of each branch and string the branches together using thin wire. Wrap branches around the bucket with pointed ends up. Press moss into the empty spaces between the branches, and tighten the wire. Secure the branches with screws from the inside of the bucket through some of the branches.

Projects 3 and 4
4. Create the base for a funky metal bucket by following the instructions for the “Covered Buckets” base (step 1). Coat the base with metallic spray paint to match the bucket, and attach to bucket using small nails. Cut a groove in each of two small wooden circles so they fit over the rim of the bucket like lemon slices perched on the rim of a drinking glass. Spray circles with metallic paint and add decorative nails. Wrap bucket tightly with lengths of chain; secure with a twist of wire. Slip silver circles over bucket rim.
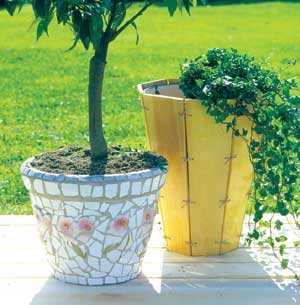
5. Find new life for broken tiles and plates in this appealing mosaic pot. Cut pottery into evenly shaped pieces for the two top rows using nippers (be sure to protect your eyes with goggles). Attach top rows around rim with tile adhesive. Add patterned pieces to circle the middle of the pot, then fill out the rest of the container with random-shape pieces. Fill the cracks between pieces with adhesive. To finish, smooth the surface and remove extra adhesive from tiles with a damp sponge before the pot dries.
Projects 5 and 6
6. Convert an everyday bucket into a handsome natural-style container using nine wooden slats. Buy a container in any shape. From waterproof plywood, cut nine equal-size slats to fit around your container (ours are 16-inch-long slats measuring 4-1/2 inches at the top and 2-1/2 inches at the bottom). Sand the edges smooth. Drill holes at four evenly spaced intervals on the long edges of the slats. Paint or varnish slats as desired. Place around bucket; tie with string through holes.